Fairy houses have always intrigued me. I used to build them with my children using items we found in nature. Using found objects and repurposing them in a way other than their intended use fuels my creativity.
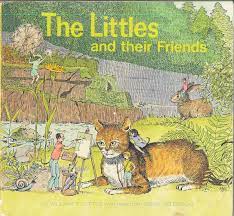
There was a book I had when I was little called The Littles and Their Friends by John Peterson. I feel like that is where my repurposing journey started. The book illustrates little humans living in the walls of houses, inside trees or even in trash dumps reusing our cast offs to create the furnishings in their homes. I was recently told that it was creepy the thought of little people living in our walls but that never really occurred to me. I was focused on the creation of space (seems to be a recurring theme with me) & living in it. Growing up, I was always making furniture and clothes from things I found around the house for dolls and their houses I created out of cardboard boxes.
I have built several dioramas mostly with Christmas themes and have really enjoyed it.
During the summer, I decided to build a fairy house and started collecting things from nature that I found when I was out walking. I began to do research on-line for some inspiration and discovered a whole new world of fairy houses.
Using the model building skills I learned in college, I began creating the structure from a glass jar, a glass vase, cardboard (all headed for the recycle bin) & hot glue. Using the glass jar & vase, not only helped give the structure stability, they also created wonderful curved windows. For the other windows in the structure, I used pieces of colored glass I had in my rather eclectic stash of art supplies.
Once the structure was ready, I began gluing pebbles on the glass vase that created a tower on one end of the house. Quickly, I learned that this would be somewhat of a challenge. I had to alternate between hot glue & E6000 (a glue that adheres to just about anything but dries slowly). The hot glue sticks to glass but pops off easily so I used it to glue some pebbles to the glass creating a ledge to keep the pebbles glued with the E6000 from sliding off the curved glass. The combination worked well. I also added pebbles to the base of the curved window on the front of the house.
Typically, clay is not a medium I like to use at all but I thought I’d give it a try. I did purchase the paper clay from Hobby Lobby but I have instructions on how to make it using egg cartons (hope to try it out soon). Using the paper clay, I covered the cardboard and in between all the pebbles.
The woodwork around the windows and the front door were also created from clay. When working with paper clay, you have to use water to keep in damp while you work with it. The moisture seeped into the cardboard as it dried leaving a pattern in the clay from the corrugation. The front steps also turned up a little on the corner from the cardboard being damp. One really great thing about a fairy house is that the imperfections give it character!

I painted the clay between the pebbles on the tower and rounded window before starting on the shingles figuring it would be easier to paint the top of the tower before the shingles were on. I used four different types of pine cones for shingles and the roof ridge. The pine cone scales I used on the main part of the roof were found locally from a long needle pine. The small scales on the tower roof were from a short needle pine. The other two types of pine cones I found while visiting my in-laws in North Carolina. Those scales were used on the two dormer windows on the back and the roof ridge. I also worked on this when I was staying at the tiny house in Amish Country.
While in North Carolina, my father-in-law (Thank you, Tom), trimmed the large wooden round I had so it would sit level and hold my fairy house. Once home, I painted the rest of the clay. With the house sitting beautifully on the wood round, I added flocking for grass and some to the roof and window ledges. A purple vine winds up the back of the tower with a few bushes on the sides. The white picket fence came from Hobby Lobby. The other little additions came from my last trip to Amish Country, mostly from the Secret Garden shop.

My daughter decided I needed a photo of myself taking photos of the fairy house.
Still not completely sure I’m finished with my fairy house. Something tells me it needs a flowering tree in the front yard next to the rocking chair and maybe a little variation of color in the grass.
Here are a few AI images I incorporated in the background to show off the interior lights. Love trying out new ways to create my artwork!
At some point, I would like to try building a fairy house that can go outside in the garden which will require me to use different materials. I’ve also seen plastic bottles and aluminum foil used in creating parts of the structure which looks really interesting. I will have to switch to a mortar or concrete that will tolerate the elements better. Lots to explore!


Comments